Hi,
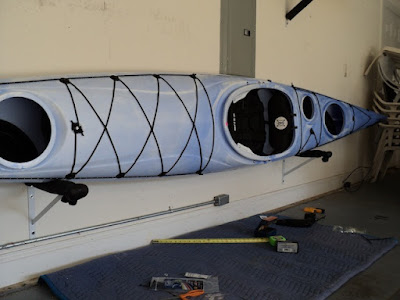
Our Perception Essence 165 touring kayaks arrived in January and ever since I've been searching for an easy, affordable kayak storage system. You know, the kind that won't break the bank account?
Well, thanks to my friend Jim, all it took was a trip to my local Lowe's Home Improvement Center. I ended up spending under $60 to hang two kayaks! Man, does it look great too!
Parts List:
2- 20" Heavy Duty Shelving Brackets ($10 ea.)
2- 15 " Heavy Duty Shelving Brackets ($9 ea.)
2- 6' Section of 1" Thick Rubber Pipe Insulation ($7 ea)
16- Plastic Zip Ties (Already had)
12- 2" Dry Wall Screws (Already had)
Total- $52
Other items you'll need:
A pair of scissors, a stud finder, pencil, and an electric screwdriver or drill with a Phillips head driver bit.
The wall I used to hang the yaks had an electric panel on it. So in order to maintain unimpeded access I decided to place one boat high and the other low.
I found some white heavy duty shelving brackets at Lowe's in the section that sells wire shelving. You may have to ask for them. These are very sturdy. I purchased a pair of 20" brackets for the top boat and 15" brackets for the bottom boat. This was because the 15" bracket allowed me the amount of space needed to clear the electric panel.
Here's what they look like and a shot of the box the 20" brackets came in.
 |
| Found them at Lowe's! |
 |
| Here's what the box looked like |
Determine Support Points:
Consult your kayak manufacturers owners manual to see what support points they suggest for your particular model. Mine basically called for one support behind the forward hatch cover and the other in front of the aft hatch. I was lucky. The wall studs were located in just the right positions!
Hang the Brackets:
Locate the wall studs using a stud finder and decide what height you need to place each bracket then secure them using dry wall screws. I used 2" screws and placed some washers over the heads just to match the mounting holes better. You could use longer screws if you want.
Install Hull Protection:
I used 1" thick rubber pipe insulation to protect against scratching the hull and form a nice non-skid surface. Don't buy the cheaper closed cell foam pipe insulation- it doesn't work as well.
Place the pipe insulation over the top bracket support and cut enough to extend past the tip by about 2 inches. Wrap the end around and use zip ties to keep the insulation in place. Because of the double wrapped end, I had to use two zip ties for extra length.
Here's what the insulation looks like:
 |
| Get the "rubber" kind not the cheap closed cell foam! |
 |
| Cut it long enough to wrap around |
 |
| Use two together if needed |
 |
| Don't forget to zip tie the end near the wall |
Repeat the process for the remaining brackets. Always double check your measurements to insure the brackets are level so your kayaks will hang straight across.
Here's the finished storage system:
 |
| Nice and level! |
 |
| The 15" brackets would have worked fine up top |
Added bonus: Use the remaining pipe insulation on the down supports of the 20" brackets and hang your paddle across too!
I hope you enjoyed this tutorial.
Cheers!


No comments:
Post a Comment